
Objective#
When a Cloud PC finishes provisioning, the user has no built-in way of knowing it’s ready. They have to keep refreshing the Windows App or the windows365.microsoft.com portal until it shows up. In this post we walk through two ways to close that gap, both of which automatically send a welcome email the moment a Cloud PC is provisioned and ready: one using Microsoft Graph and PowerShell, and the other using a Logic App.
Gotchas#
There are several things we need to account for in our logic.
- Flex Shared devices are shared with a group, so we will want to notify all members of the group.
- A Flex Shared provisioning policy assignment defines an allotment, which is the licensed seat count exposed to a group. The allotment is backed by a pool of Cloud PCs, and the service routes each connecting user to whichever CPC in the pool is available. So if at least one CPC in the pool is already provisioned, we don’t alert users when another one is added or reprovisioned.
- End users normally see a Cloud PCs
displayNamein their Windows App (not themanagedDeviceName). Flex Shared devices are different. Users see theallotmentDisplayNamedefined on the provisioning policy, so for Flex Shared the email usesallotmentDisplayNameinstead. - We don’t send a duplicate email for a Cloud PC we’ve already notified about.
Implementation options#
Microsoft Graph#
The first option we have is to use the Microsoft Graph REST API. This gives us the greatest flexibility and customization. We are going to first start by going through the different endpoints that we have available to us and what is returned in each one. If you want to fast forward directly to finished script then head down to putting it all together
The cloudPCs endpoint#
Microsoft Graph includes the /deviceManagement/virtualEndpoint/cloudPCs endpoint in the beta API which we can use to list Cloud PCs in our tenant and gather rich endpoint details. The API gives us the following response:
{
    "id": "941faead-a5db-44ba-aed6-f5c06cea0d18",
    "displayName": "",
    "imageDisplayName": "customw365",
    "provisioningPolicyId": "8e8a545f-6168-4472-9466-9f05520a5eb3",
    "provisioningPolicyName": "W365-Flex-Shared",
    "onPremisesConnectionName": "",
    "servicePlanId": "dd3801e2-4aa1-4b16-a44b-243e55497584",
    "servicePlanName": "Cloud PC Frontline 4vCPU/16GB/128GB",
    "status": "provisioned",
    "userPrincipalName": null,
    "lastModifiedDateTime": "2026-05-17T16:00:08.5878348Z",
    "managedDeviceId": "61f18b2b-8d04-44b4-bed0-1cb813d09a03",
    "managedDeviceName": "CFS-AVVP50J64LL",
    "aadDeviceId": "ba37f1d1-e7af-4bd5-8d82-67e1ea6b6c07",
    "gracePeriodEndDateTime": null,
    "servicePlanType": "enterprise",
    "diskEncryptionState": "encryptedUsingPlatformManagedKey",
    "provisioningType": "sharedByEntraGroup",
    "statusDetails": null,
    "statusDetail": null,
    "partnerAgentInstallResults": []
}
Adding provisionedDateTime to the response#
Within this response we can see the status property that will tell us if a Cloud PC is provisioned or not. But we do not see a property to help us with the datetime a Cloud PC completed its provisioning. Luckily, it’s included at the same endpoint but we must specifically call for it. In the example below I will include the provisionedDateTime as well as details on the lastRemoteActionResults in the response.
GET https://graph.microsoft.com/beta/deviceManagement/virtualEndpoint/cloudPCs?$select=id,displayName,imageDisplayName,provisioningPolicyId,provisioningPolicyName,onPremisesConnectionName,servicePlanId,servicePlanName,status,provisioningType,userPrincipalName,lastModifiedDateTime,managedDeviceId,managedDeviceName,statusDetail,gracePeriodEndDateTime,diskEncryptionState,partnerAgentInstallResults,connectionSetting,deviceRegionName,allotmentDisplayName,provisionedDateTime,lastRemoteActionResult,userExperienceTypeWith this new call, our response will be:
{
    "id": "95194d88-cec5-4b65-af62-26dbd1814364",
    "displayName": "Not provisioned",
    "imageDisplayName": null,
    "provisioningPolicyId": "00000000-0000-0000-0000-000000000000",
    "provisioningPolicyName": "",
    "onPremisesConnectionName": "",
    "servicePlanId": "dd3801e2-4aa1-4b16-a44b-243e55497584",
    "servicePlanName": "Cloud PC Frontline 4vCPU/16GB/128GB",
    "status": "provisioning",
    "userPrincipalName": "brad@windowsfromanywhere.com",
    "lastModifiedDateTime": "2026-05-20T17:36:49Z",
    "managedDeviceId": null,
    "managedDeviceName": null,
    "gracePeriodEndDateTime": null,
    "deviceRegionName": "",
    "diskEncryptionState": "notAvailable",
    "provisioningType": "sharedByUser",
    "allotmentDisplayName": "",
    "userExperienceType": "cloudPc",
    "provisionedDateTime": "2026-05-20T17:36:49.1553926Z",
    "connectionSetting": null,
    "statusDetail": null,
    "lastRemoteActionResult": {
        "actionName": "Reprovision",
        "actionState": "active",
        "startDateTime": "2026-05-20T17:35:02.2153289Z",
        "lastUpdatedDateTime": "2026-05-20T17:35:02.2153292Z",
        "cloudPcId": "95194d88-cec5-4b65-af62-26dbd1814364",
        "managedDeviceId": "ab2cb5e6-3577-4a37-ae57-4297feb6c3e8",
        "statusDetails": null,
        "statusDetail": null
    },
    "partnerAgentInstallResults": []
}
Now that I know exactly the properties I need, I can create the following HTTP call that will return the device id,displayName,status,userPrincipalName,provisioningType,provisionedDateTime,provisioningPolicyId,and lastRemoteActionResult
GET https://graph.microsoft.com/beta/deviceManagement/virtualEndpoint/cloudPCs?$select=id,displayName,status,userPrincipalName,provisioningType,provisionedDateTime,provisioningPolicyId,lastRemoteActionResultThe response is as follows:
{
    "id": "95194d88-cec5-4b65-af62-26dbd1814364",
    "displayName": "W365-Flex-Dedicated - Bradley Wyatt",
    "provisioningPolicyId": "27d60840-6888-44b9-aefd-e5f8f1a92add",
    "status": "provisioned",
    "userPrincipalName": "brad@windowsfromanywhere.com",
    "provisioningType": "sharedByUser",
    "provisionedDateTime": "2026-05-20T18:12:09.2165236Z",
    "lastRemoteActionResult": {
        "actionName": "Reprovision",
        "actionState": "done",
        "startDateTime": "2026-05-20T17:29:22.5086607Z",
        "lastUpdatedDateTime": "2026-05-20T18:12:45.1410091Z",
        "cloudPcId": "95194d88-cec5-4b65-af62-26dbd1814364",
        "managedDeviceId": "00000000-0000-0000-0000-000000000000",
        "statusDetails": null,
        "statusDetail": {
            "code": null,
            "message": null,
            "additionalInformation": [
                {
                    "name": "hasDownTime",
                    "value": "True"
                }
            ]
        }
    }
},
{
    "id": "f55ba1ae-4d31-4b41-a19f-5ca6fd5d8ffe",
    "displayName": "W365-Enterprise - Bradley Wyatt",
    "provisioningPolicyId": "95761b33-beea-4208-92a1-5c5bb101693b",
    "status": "provisioned",
    "userPrincipalName": "brad@windowsfromanywhere.com",
    "provisioningType": "dedicated",
    "provisionedDateTime": "2026-05-16T13:07:39.5091959Z",
    "lastRemoteActionResult": {
        "actionName": "Reprovision",
        "actionState": "done",
        "startDateTime": "2026-05-16T12:21:40.0350771Z",
        "lastUpdatedDateTime": "2026-05-16T13:07:45.2655151Z",
        "cloudPcId": "f55ba1ae-4d31-4b41-a19f-5ca6fd5d8ffe",
        "managedDeviceId": "00000000-0000-0000-0000-000000000000",
        "statusDetails": null,
        "statusDetail": {
            "code": null,
            "message": null,
            "additionalInformation": [
                {
                    "name": "hasDownTime",
                    "value": "True"
                }
            ]
        }
    }
}
Filtering to recently provisioned Cloud PCs#
But we don’t care about Cloud PCs that have not been provisioned recently. Parsing them will just be additional overhead. Luckily, we can use the $filter OData query parameter to only return Cloud PCs that have been provisioned recently.
GET https://graph.microsoft.com/beta/deviceManagement/virtualEndpoint/cloudPCs?$filter=provisionedDateTime ge 2026-05-20T17:00:00Z&$select=id,displayName,status,userPrincipalName,provisioningType,provisionedDateTime,provisioningPolicyId,lastRemoteActionResult{
"id": "95194d88-cec5-4b65-af62-26dbd1814364",
"displayName": "W365-Flex-Dedicated - Bradley Wyatt",
"provisioningPolicyId": "27d60840-6888-44b9-aefd-e5f8f1a92add",
"status": "provisioned",
"userPrincipalName": "brad@windowsfromanywhere.com",
"provisioningType": "sharedByUser",
"provisionedDateTime": "2026-05-20T18:12:09.2165236Z",
"lastRemoteActionResult": {
"actionName": "Reprovision",
"actionState": "done",
"startDateTime": "2026-05-20T17:29:22.5086607Z",
"lastUpdatedDateTime": "2026-05-20T18:12:45.1410091Z",
"cloudPcId": "95194d88-cec5-4b65-af62-26dbd1814364",
"managedDeviceId": "00000000-0000-0000-0000-000000000000",
"statusDetails": null,
"statusDetail": {
"code": null,
"message": null,
"additionalInformation": [
{
"name": "hasDownTime",
"value": "True"
}
]
}
}
}Using this data, we know the current status of the Cloud PC, the user assigned to the Cloud PC and the provisioning Date, all of which will enable us to check for recently provisioned Cloud PCs and send the user an email. However, with the Flex shared Cloud PCs, we need to add additional logic due to the conditions listed in the gotchas section
Handling Flex Shared#
Since Flex Shared Cloud PCs are Cloud PCs shared with more than one user, we will need to add logic to account for this. In our original Graph API call we see that we include the provisioningPolicyId value. Pairing this with the provisioningType property we can add a conditional statement that if the provisioningType is equal to sharedByEntraGroup we will then look up the Provisioning Policy by the provisioningPolicyId and look up the assignments for the policy so we can get all of the users that we must send an email to.
Resolving the assignment group#
Since Flex Shared devices are assigned to a group of people, we need to look up the provisioning policy to get the group assignment, then get all members of the group. To get the provisioning policy assignments we can query the /deviceManagement/virtualEndpoint/provisioningPolicies endpoint in the beta api. But, by default, assignments is not included. To show assignments we need to use the $expand parameter:
GET https://graph.microsoft.com/beta/deviceManagement/virtualEndpoint/provisioningPolicies?$expand=assignmentsThis will return the assignments for each provisioning policy. You might also notice that within assignments we also get the allotmentDisplayName which is the name the end user will see instead of the typical displayName property.
{
    "id": "8e8a545f-6168-4472-9466-9f05520a5eb3",
    "displayName": "W365-Flex-Shared",
    "description": "",
    "imageId": "da09e34f-e60b-453d-8a2a-17eb2fdbc734",
    "imageDisplayName": "customw365",
    "imageType": "custom",
    "enableSingleSignOn": true,
    "cloudPcNamingTemplate": "CFS-%RAND:11%",
    "provisioningType": "sharedByEntraGroup",
    "managedBy": "windows365",
    "scopeIds": [
        "0"
    ],
    "createdDateTime": "2026-05-11T20:40:44.7551172Z",
    "lastModifiedDateTime": "2026-05-16T12:22:28.7754297Z",
    "createdBy": "5f660169-d691-487d-970b-965a43b00dd2",
    "lastModifiedBy": "0678498b-2b17-4c87-8572-b588296c085f",
    "autopatch": null,
    "domainJoinConfigurations": [
        {
            "domainJoinType": "azureADJoin",
            "type": "azureADJoin",
            "regionName": "centralus",
            "onPremisesConnectionId": null,
            "regionGroup": "usCentral",
            "geographicLocationType": "usCentral"
        }
    ],
    "microsoftManagedDesktop": {
        "managedType": "notManaged",
        "type": "notManaged",
        "profile": null
    },
    "windowsSetting": {
        "locale": "en-US"
    },
    "windowsSettings": {
        "language": "en-US"
    },
    "autopilotConfiguration": {
        "devicePreparationProfileId": "925fbea4-b0d5-4db9-884c-830f5828f1fc",
        "applicationTimeoutInMinutes": 60,
        "onFailureDeviceAccessDenied": false
    },
    "assignments@odata.context": "https://graph.microsoft.com/beta/$metadata#deviceManagement/virtualEndpoint/provisioningPolicies('8e8a545f-6168-4472-9466-9f05520a5eb3')/assignments",
    "assignments": [
        {
            "id": "b4621574-cef5-4e15-92b8-c7be2ed6fe46",
            "target": {
                "@odata.type": "#microsoft.graph.cloudPcManagementGroupAssignmentTarget",
                "groupId": "3c21cf2b-8b30-460a-9741-1c7377b2f2bf",
                "servicePlanId": "dd3801e2-4aa1-4b16-a44b-243e55497584",
                "allotmentDisplayName": "CPC-Shared-1",
                "allotmentLicensesCount": 1
            }
        }
    ]
}
Since the Cloud PC’s own displayName is usually empty on Flex Shared devices, we pull allotmentDisplayName from assignments[0].target and use that in both the email subject and body. That way the name in the email matches what the user sees in their Windows App.
Now that we have the groupId we can query the /groups/{id}/members endpoint to get all the members of the group. In my example, I am using the $select parameter to include the users displayName and mail properties.
https://graph.microsoft.com/v1.0/groups/3c21cf2b-8b30-460a-9741-1c7377b2f2bf/members?$select=displayName,mailI am sent the following response:
{
    "@odata.type": "#microsoft.graph.user",
    "displayName": "Billie Vester",
    "mail": "BillieV@windowsfromanywhere.com"
},
{
    "@odata.type": "#microsoft.graph.user",
    "displayName": "Bradley Wyatt",
    "mail": "brad@windowsfromanywhere.com"
}
Only alert once per allotment#
Another caveat with Flex Shared is that you can have a pool of devices available to your users, but they will only see one. When a user attempts to connect, the service checks for an available Cloud PC in the pool and routes them to it. Because of this, when we provision or reprovision a Cloud PC in a pool, we only want to alert on it if no other Cloud PCs in the pool are already in a provisioned state.
Sending an alert when other Cloud PCs are already provisioned can confuse end users. They may already be working in another Flex Shared Cloud PC, or they may see the email and assume their session isn’t working properly.
To handle this, we get all Cloud PCs associated with the provisioning policy that are in a provisioned state. If there is more than one, we sort them by provisionedDateTime. If the Cloud PC we are parsing is not the earliest one provisioned, we know another Cloud PC is already available and skip the alert.
[string]$uri = "https://graph.microsoft.com/beta/deviceManagement/virtualEndpoint/cloudPCs?`$filter=provisioningPolicyId eq '$($PC.provisioningPolicyId)' and status eq 'provisioned'&`$select=id,displayName,status,userPrincipalName,provisioningPolicyId,provisioningType,provisionedDateTime"
        $policyCloudPCs = Get-MSGraphRequest -Uri $uri -AccessToken $tokenResponse.access_token
        # If multiple Cloud PCs were provisioned under the same provisioning policy,
        # only send one email for the earliest provisioned Cloud PC and skip the others.
        if ($policyCloudPCs.count -gt 1) {
            $sortedPCs = $policyCloudPCs | Sort-Object -Property provisionedDateTime
            $firstPC = $sortedPCs[0]
            if ($PC.id -ne $firstPC.id) {
                Write-Verbose "Multiple Cloud PCs provisioned under the same provisioning policy: $($PC.provisioningPolicyId). Skipping sending email for Cloud PC: $($PC.displayName) because another Cloud PC was provisioned earlier."
                continue
            }
        }
Avoiding duplicate emails#
The runbook looks back 10 minutes for newly provisioned Cloud PCs and runs every 5 minutes, which means any given Cloud PC can show up in two consecutive runs. To make sure we only alert once per provisioning event, we keep a small state record for every Cloud PC we have already emailed about.
The state lives in an Azure Automation variable called SentCloudPCEmails and holds a JSON array of entries shaped like this:
{
    "id": "95194d88-cec5-4b65-af62-26dbd1814364",
    "provisionedAt": "2026-05-20T18:12:09.2165236Z",
    "sentAt": "2026-05-20T18:13:02.4410000Z"
}
Each entry tracks three things:
- id: the Cloud PC’s unique id, so we can match it against future runs.
- provisionedAt: the value of
provisionedDateTimeat the time we emailed. Pairing the id with this timestamp lets us tell the difference between “we already alerted on this exact provision” and “the same Cloud PC was reprovisioned and now has a newprovisionedDateTime”. If the user reprovisions their Cloud PC tomorrow, the id is the same but provisionedAt is new, so we send a fresh email. - sentAt: when our runbook actually sent the email. Used for the retention pruner so the variable does not grow forever (entries older than 30 days are dropped on each save).
On every run we:
- Load the state JSON from the Automation variable into an array.
- For each candidate Cloud PC, check if the id plus
provisionedAtpair already exists. If it does, skip it. - After a successful send, append a new entry for that Cloud PC.
- At the end of the run, prune anything older than 30 days and write the JSON back to the variable.
This gives us idempotent runs without needing a database or storage account, while still doing the right thing when a Cloud PC is reprovisioned.
Putting it all together#
Now that we walked through the logic and what is available to us in the Microsoft Graph API, let’s put it all into production.
1. App Registration#
The first thing we need to do is create an App Registration so we can interact with the Microsoft Graph API on its behalf. Using an account with appropriate permissions head over to the App Registrations blade and click "+ New registration"
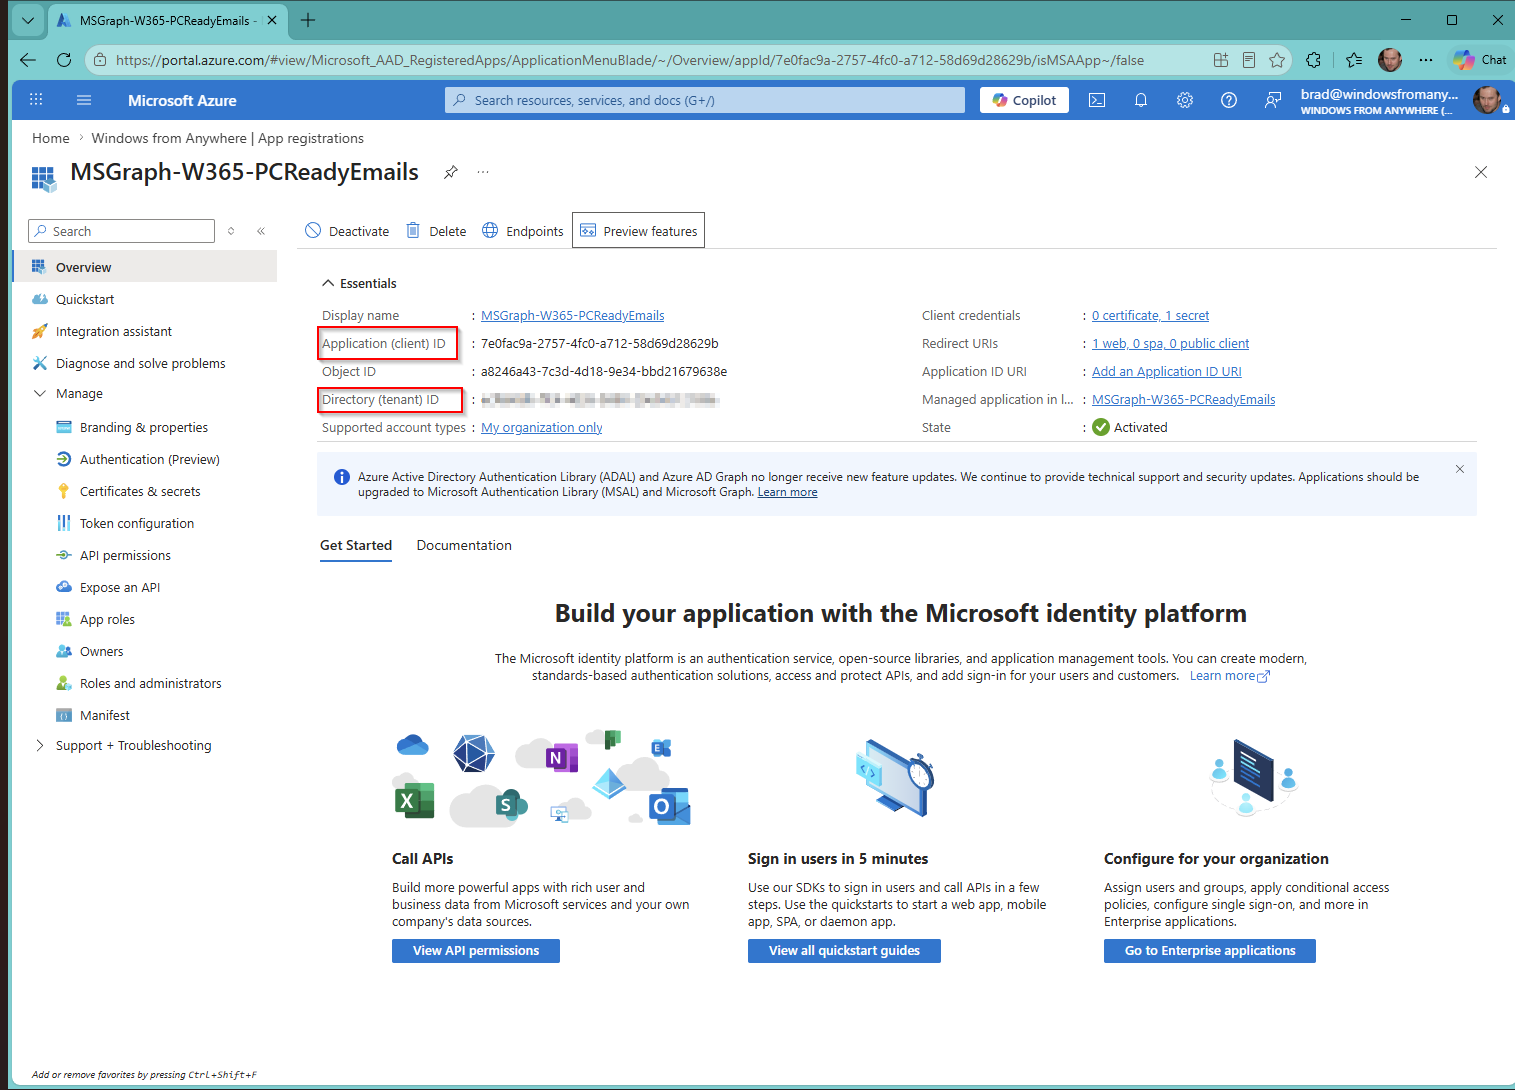
Give your application a name, for my example I used “MSGraph-W365-PCReadyEmails”, for Supported account types I selected Single tenant, and for the Redirect URI I entered “https://localhost”, When it’s been created, note the Application (client) ID and the Directory (tenant) ID for later.
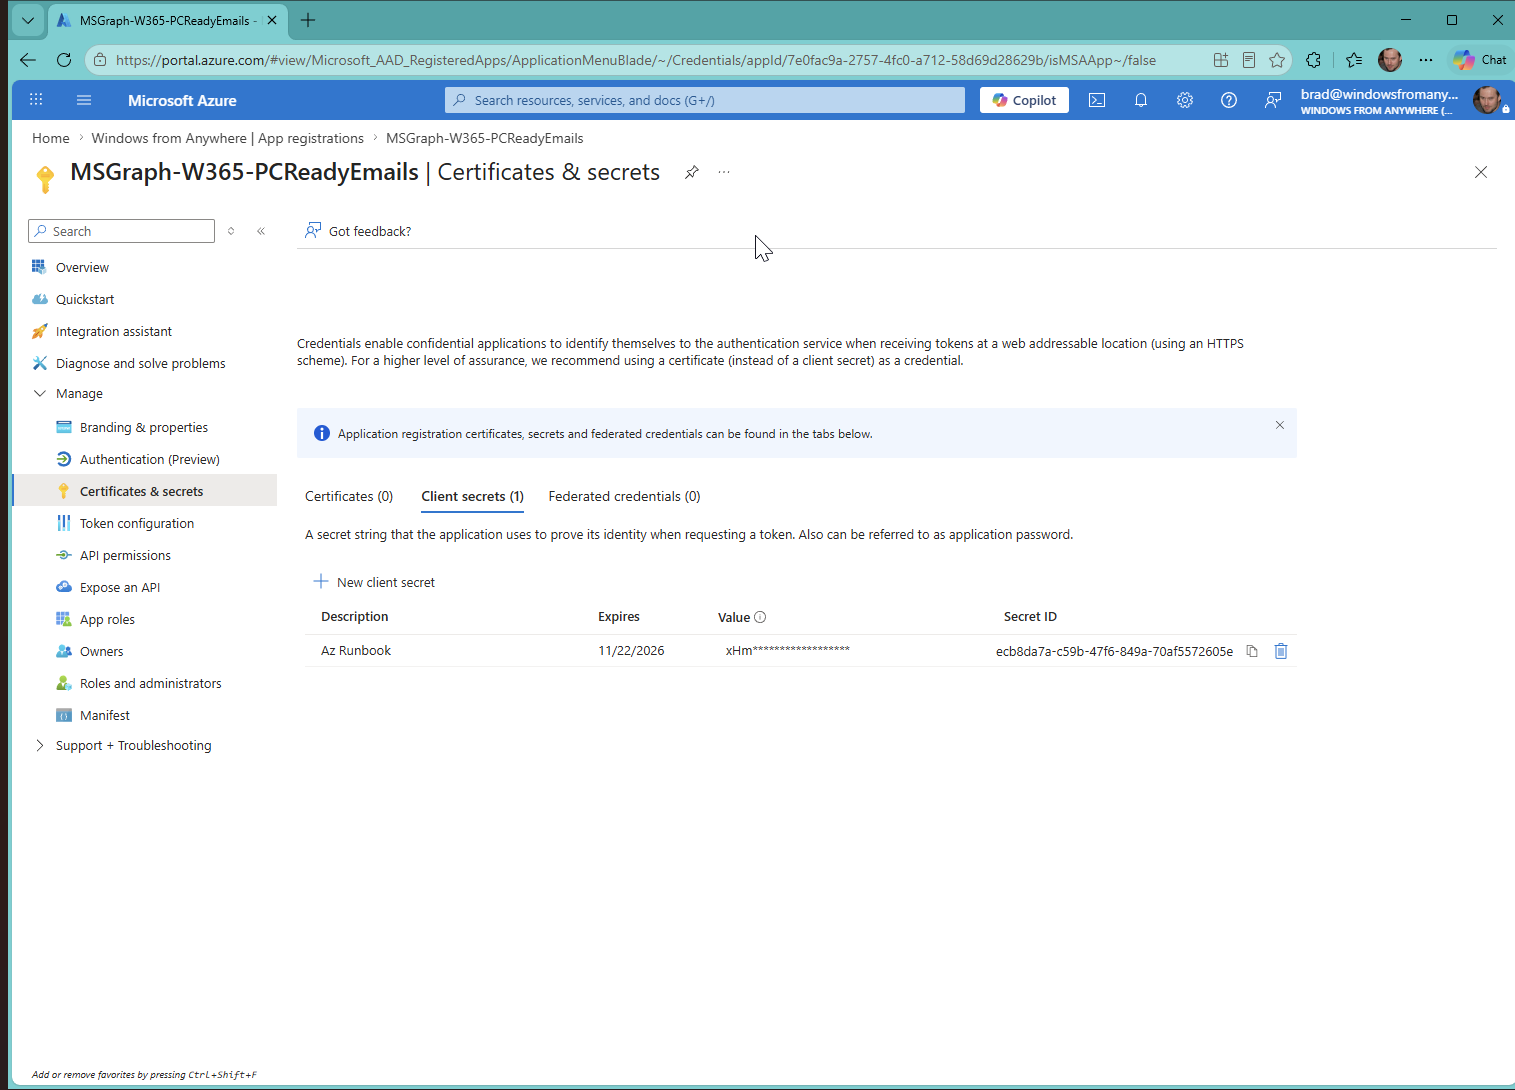
Next, click Certificates & Secrets under Manage. Create a new client secret and note the value for later.
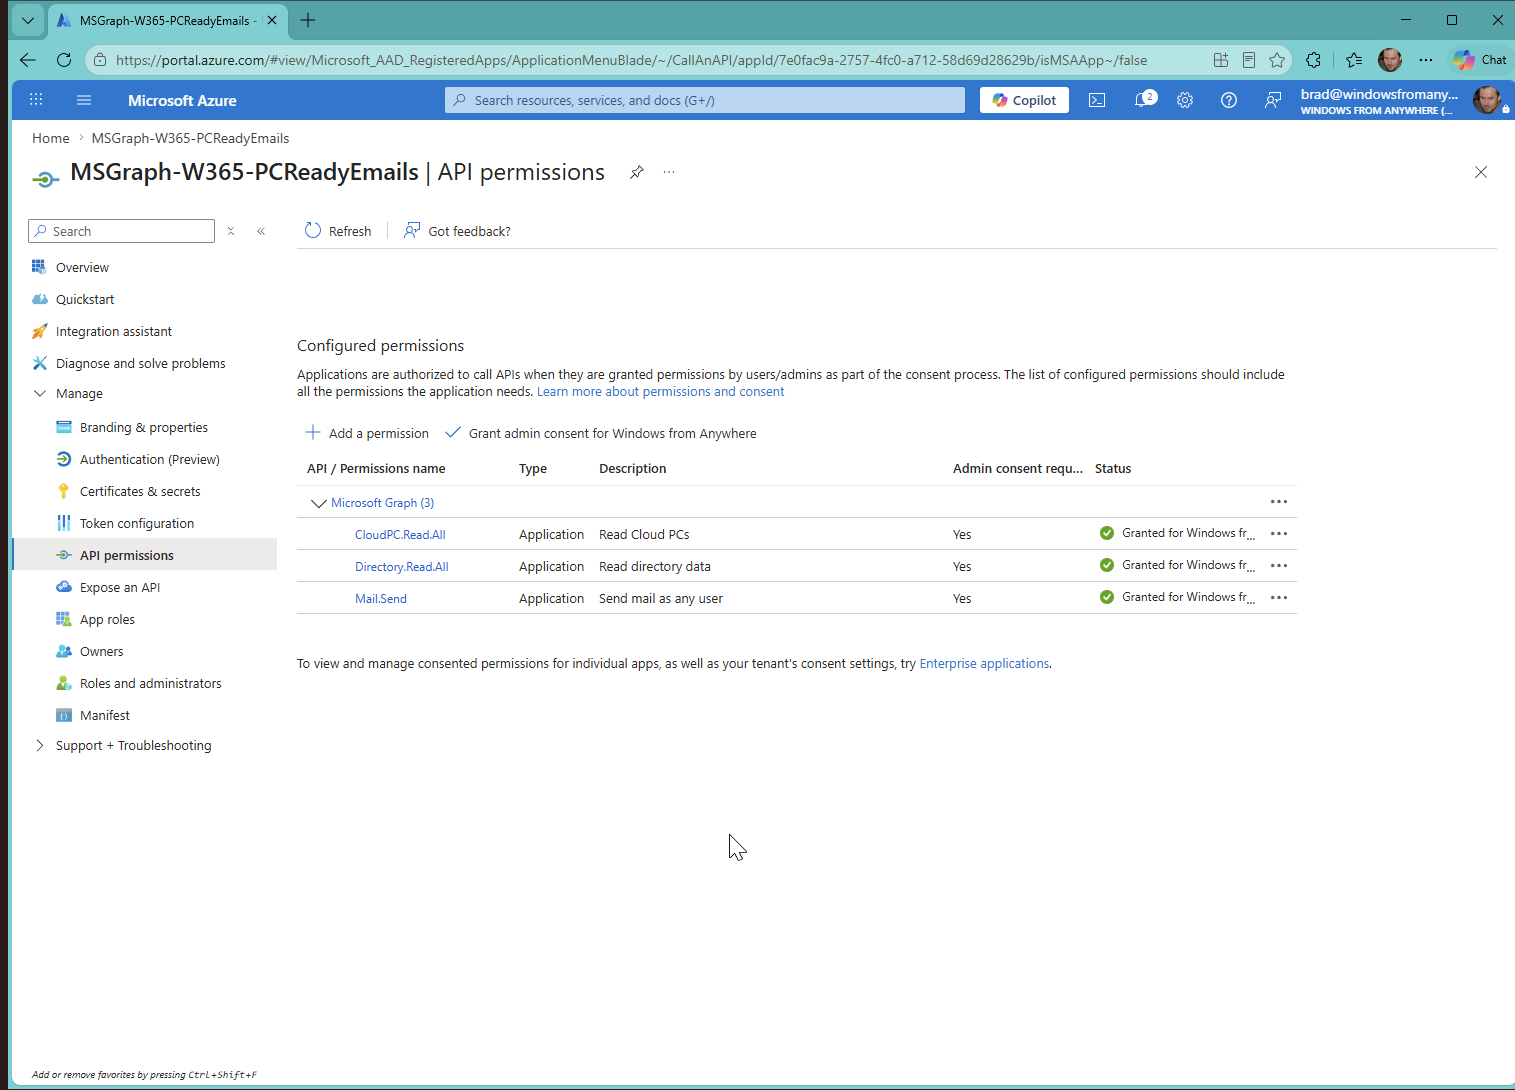
Back under “Manage”, click “API permissions”. Click Add a permission, select “Microsoft Graph” and then “Application permissions”. Add the following permissions and then grant admin consent.
- CloudPC.Read.All
- Directory.Read.All
- Mail.Send
2. Azure Runbook#
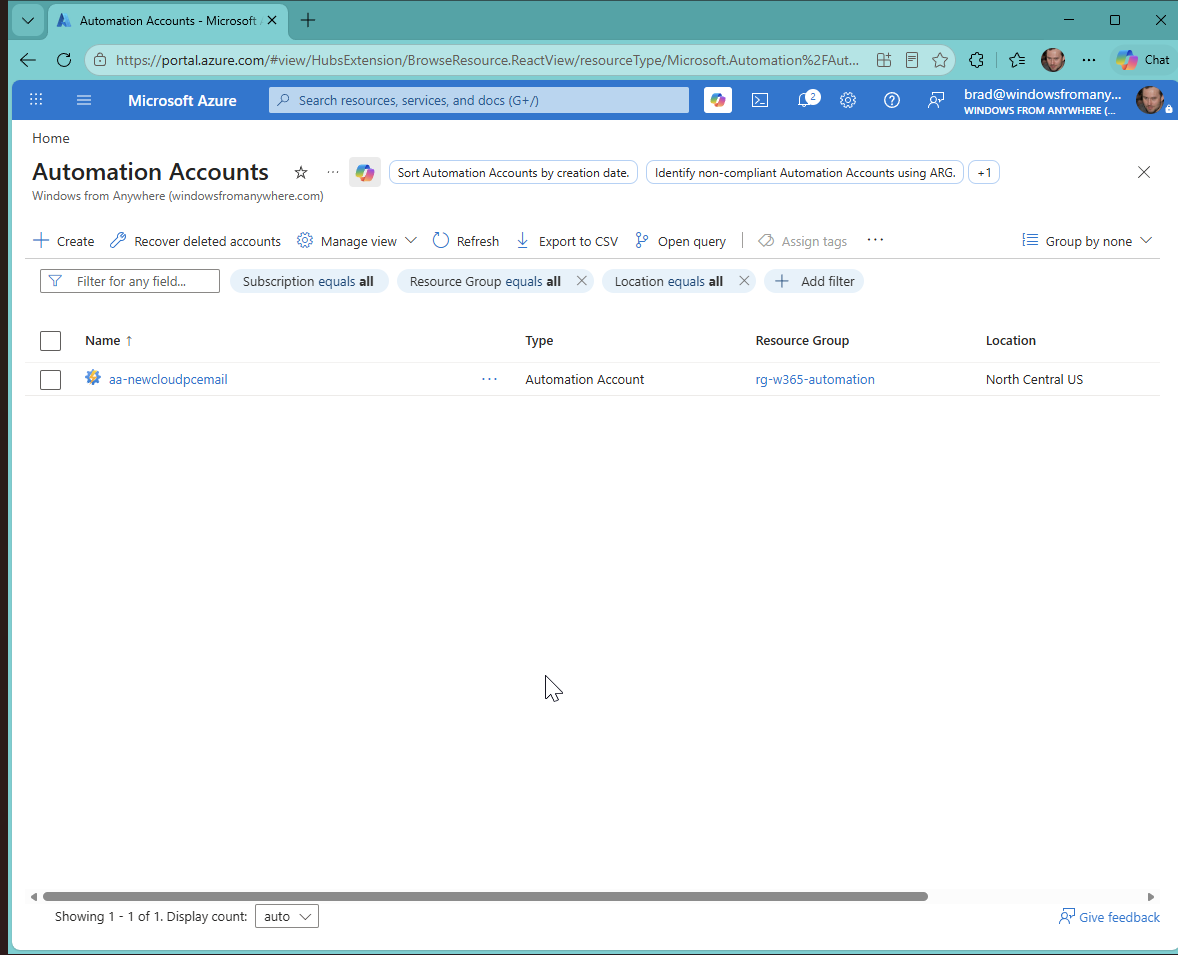
Next, we need to create a new Azure Runbook which will run our automation. In the Azure Portal, under Automation Accounts create a new automation account. In my example I named mine “aa-newcloudpcemail”.
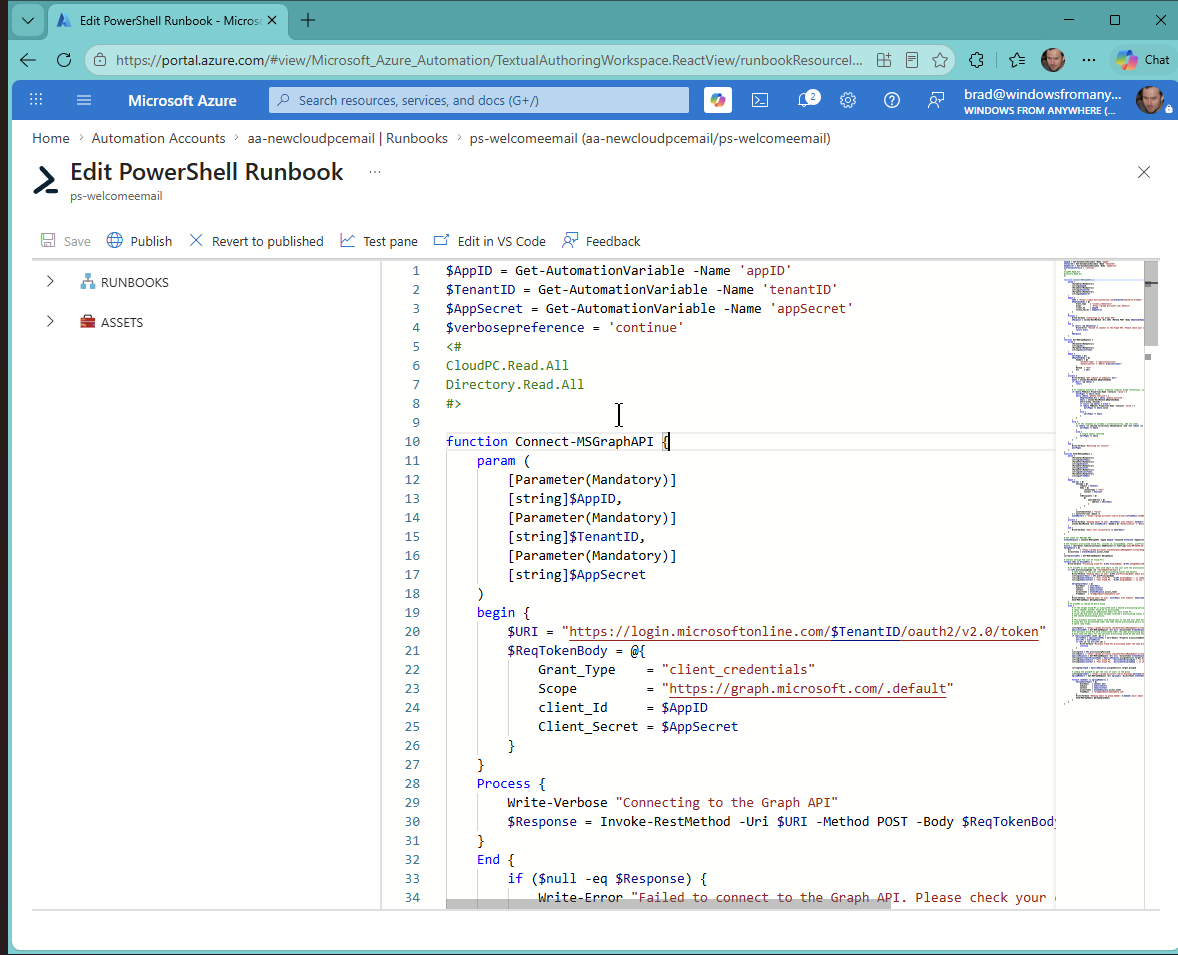
Create a new PowerShell runbook and then save and publish the runbook, copying the code from GitHub.
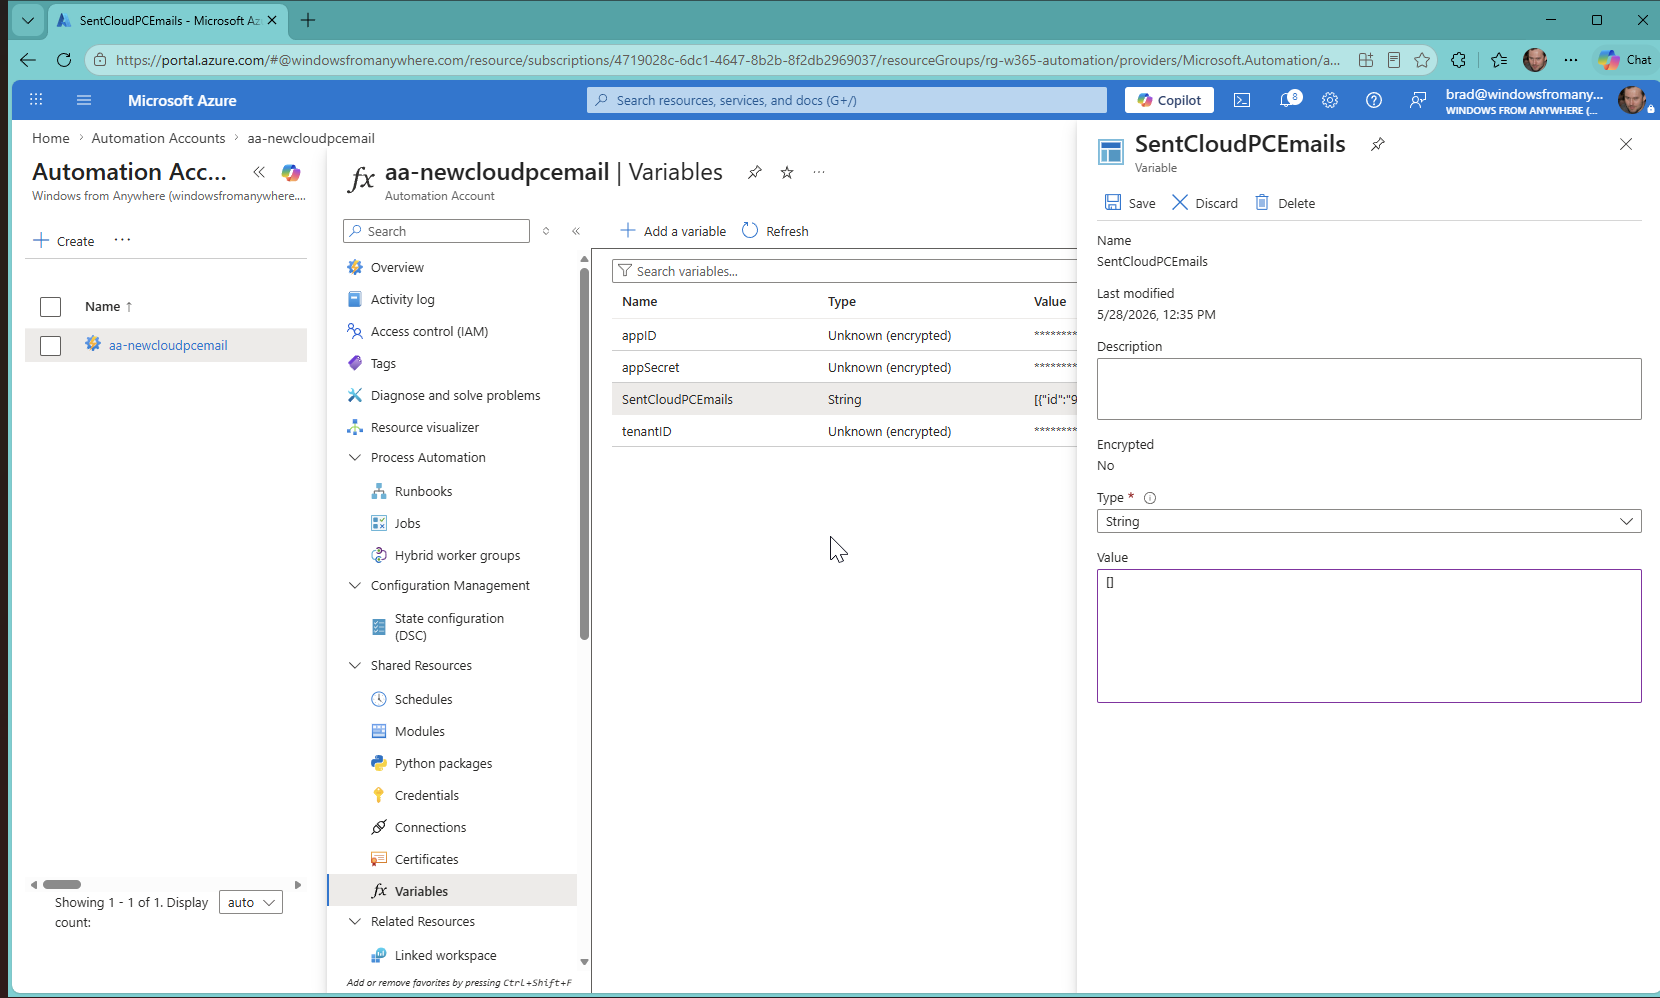
Back under the Automation Account, under “Shared Resources” select “Variables” and we are going to add the following 4 variables:
- appID (this is the application/client ID from earlier)
- appSecret (the application secret for our app, ensure you enable this one to be encrypted)
- tenantID (the directory/tenant ID from earlier)
- SentCloudPCEmails (deduplication state for the runbook). Type: String. Value:
[]. Do not encrypt this one.
These four variables allow the runbook to ingest the values at runtime instead of hardcoding them.
3. Schedule#
The last piece of the puzzle is to set up a schedule for the runbook to run. I have it run every 5 minutes. If you want to run it at a different interval make sure you change (in the runbook) how recently the runbook looks for newly provisioned Cloud PCs:
# Get recently provisioned Cloud PCs, include id, displayName, status, userPrincipalName, provisioningType, provisionedDateTime, provisioningPolicyId and lastRemoteActionResult
$since = (Get-Date).ToUniversalTime().AddMinutes(-10).ToString("yyyy-MM-ddTHH:mm:ss.ffffffZ")
$GraphSplat = @{
    Uri         = "https://graph.microsoft.com/beta/deviceManagement/virtualEndpoint/cloudPCs?`$select=id,managedDeviceName,displayName,status,userPrincipalName,provisioningPolicyId,provisioningType,provisionedDateTime&`$filter=provisionedDateTime ge $since and status eq 'provisioned'"
    AccessToken = $tokenResponse.access_token
}
[array]$CloudPCs = Get-MSGraphRequest @GraphSplat
Since 5 minutes is more often than default Runbook schedules allow, you have two choices:
- Create multiple schedules and link them to your runbook
- Have a Logic App run every ‘x’ minute and invoke our Runbook.
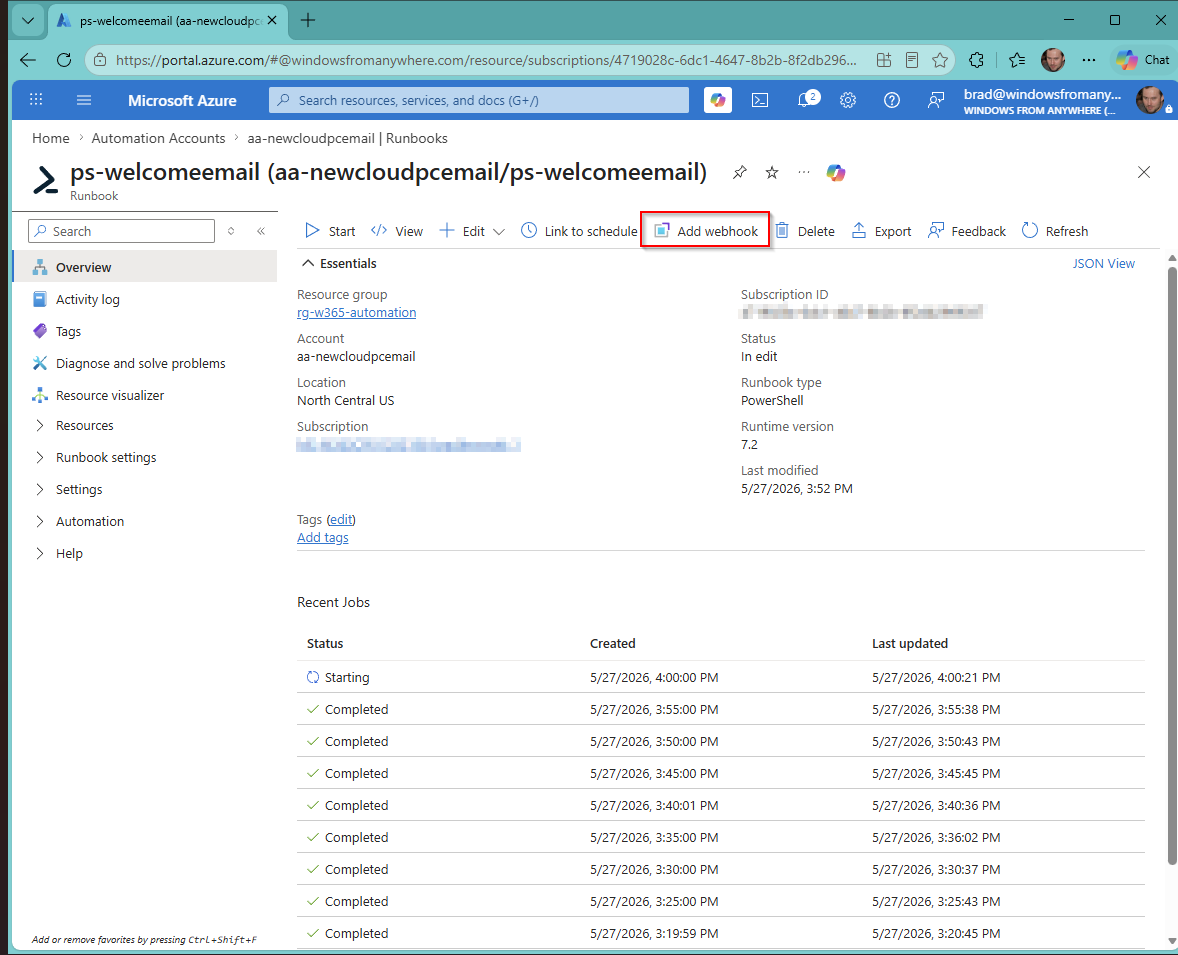
I opted for option 2 because it’s way quicker. Go to your Runbook and click “Add a webhook” and copy the value.
Create a new Logic App and the trigger is going to be “Recurrence” (set with your desired amount) and the action will be “HTTP”. For the HTTP action make sure it’s a POST and paste the URI from the step above. Save and that’s it. We don’t need to include anything in the body of the HTTP Post.
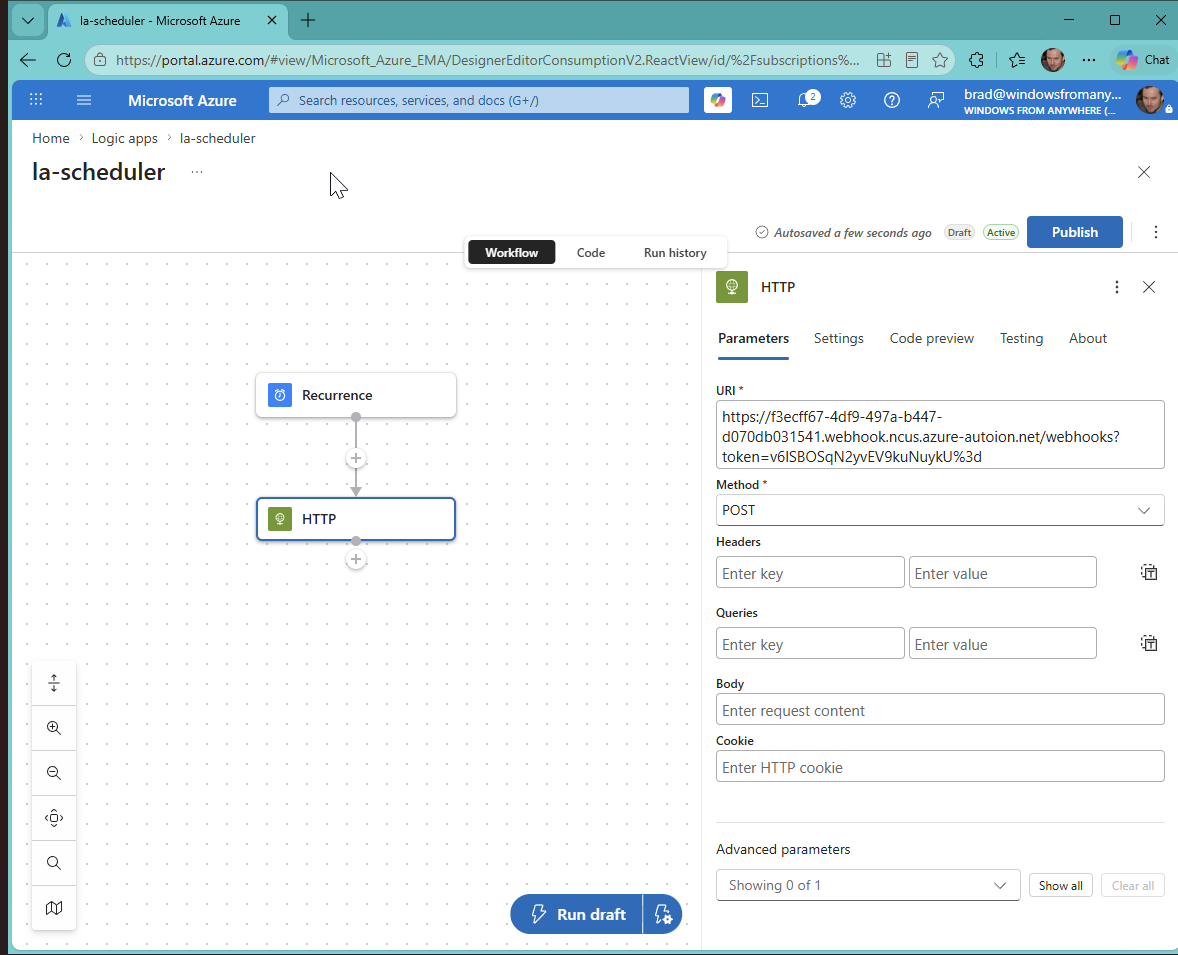
In the Logic App’s HTTP action settings, set Concurrency Control to 1 so overlapping runs can’t race the state variable.
Logic Apps#
The other option we have available is to utilize Logic Apps. At the time of writing this, the Windows 365 connectors are in Preview.
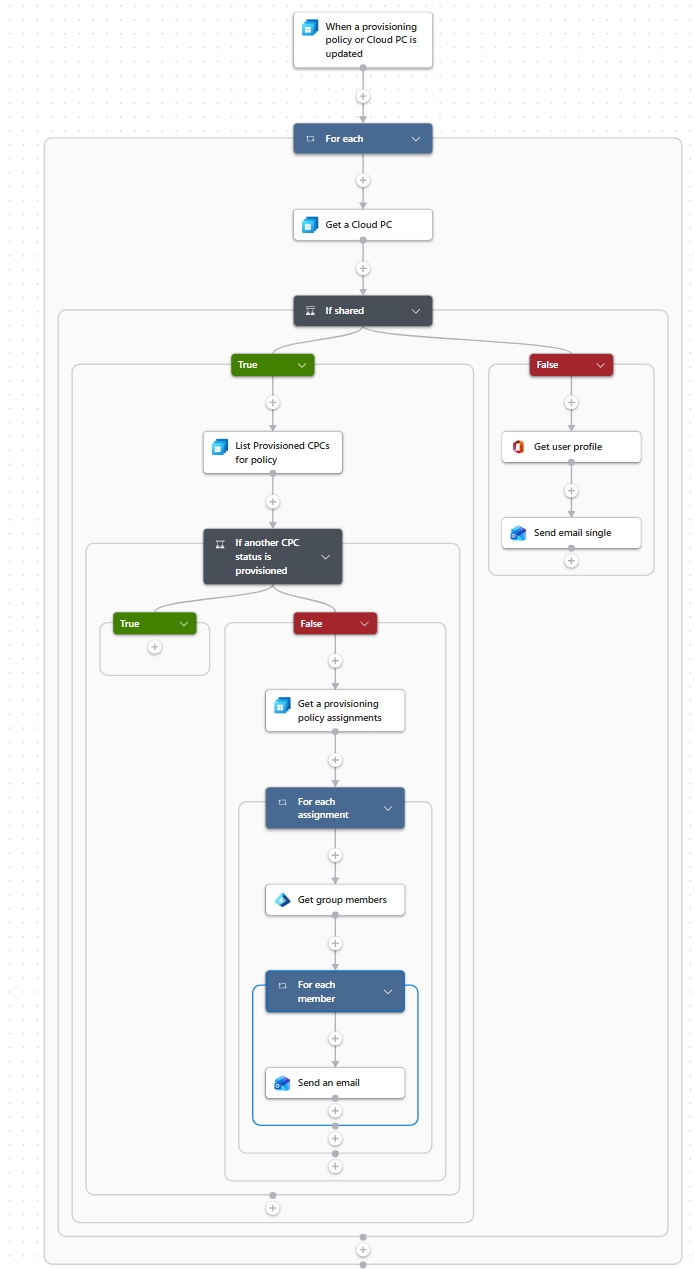
Handling Flex Shared#
To determine if the Cloud PC that was created is a Flex Shared device, we are looking up the provisioningType and seeing if the value is sharedByEntraGroup.
"type": "If",
  "expression": {
    "equals": [
      "@body('Get_a_Cloud_PC')?['provisioningType']",
      "sharedByEntraGroup"
    ]
  }
Next, to see if the Cloud PC is part of a pool with other provisioned Cloud PCs we are getting all provisioned Cloud PCs associated to the provisioning policy and if there are none returned then we know that we can continue to alert the user.
"type": "If",
  "expression": {
    "and": [
      {
        "equals": [
          "@empty(body('List_Provisioned_CPCs_for_policy')?['value'])",
          "@false"
        ]
      }
    ]
  }
Putting it all together#
To make this easy to share, I used the Playbook ARM Template Generator (originally written for Microsoft Sentinel playbooks, but it works on any Logic App). It strips out organization-specific values and generates a parameterized ARM template you can deploy straight into your own subscription.
First, copy the ARM template from GitHub. Next, head over to the Azure Portal and in the search bar look up “ARM Template” and select “Deploy a custom template”.
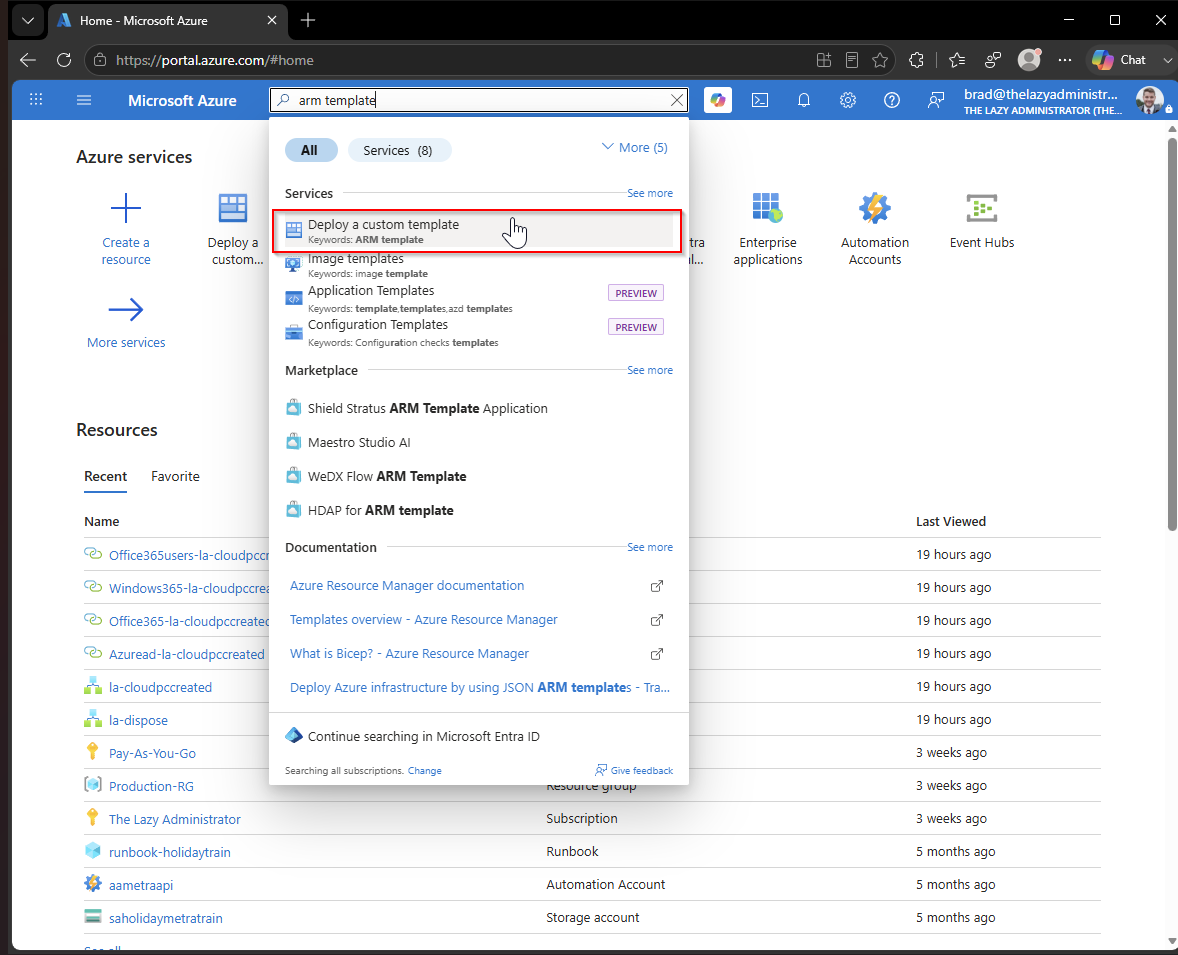
Click “Build your own template in the editor” and then paste the code we copied from GitHub, replacing everything that was there.
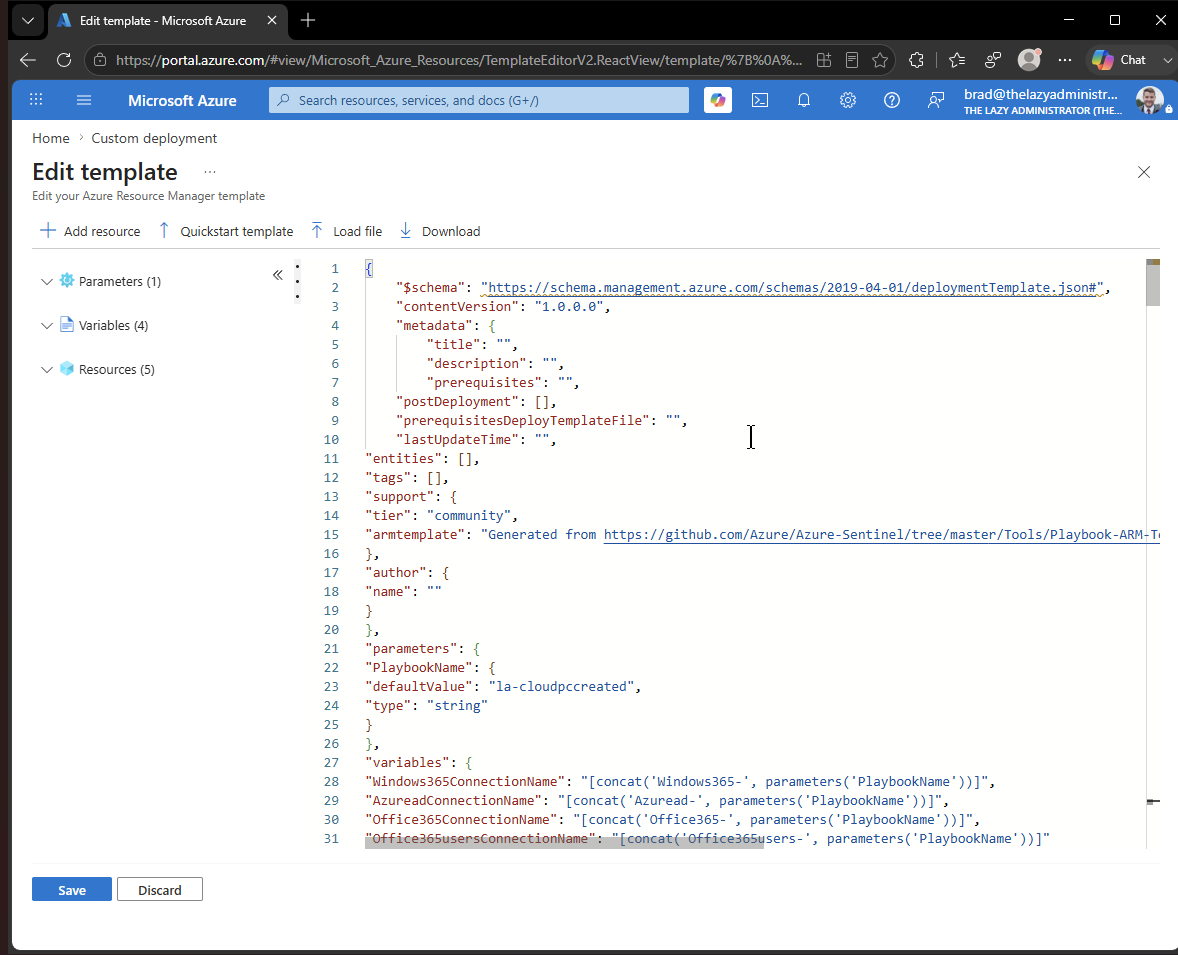
Select the Subscription, Resource Group, Region and Playbook Name. Once finished, click Review + Create.

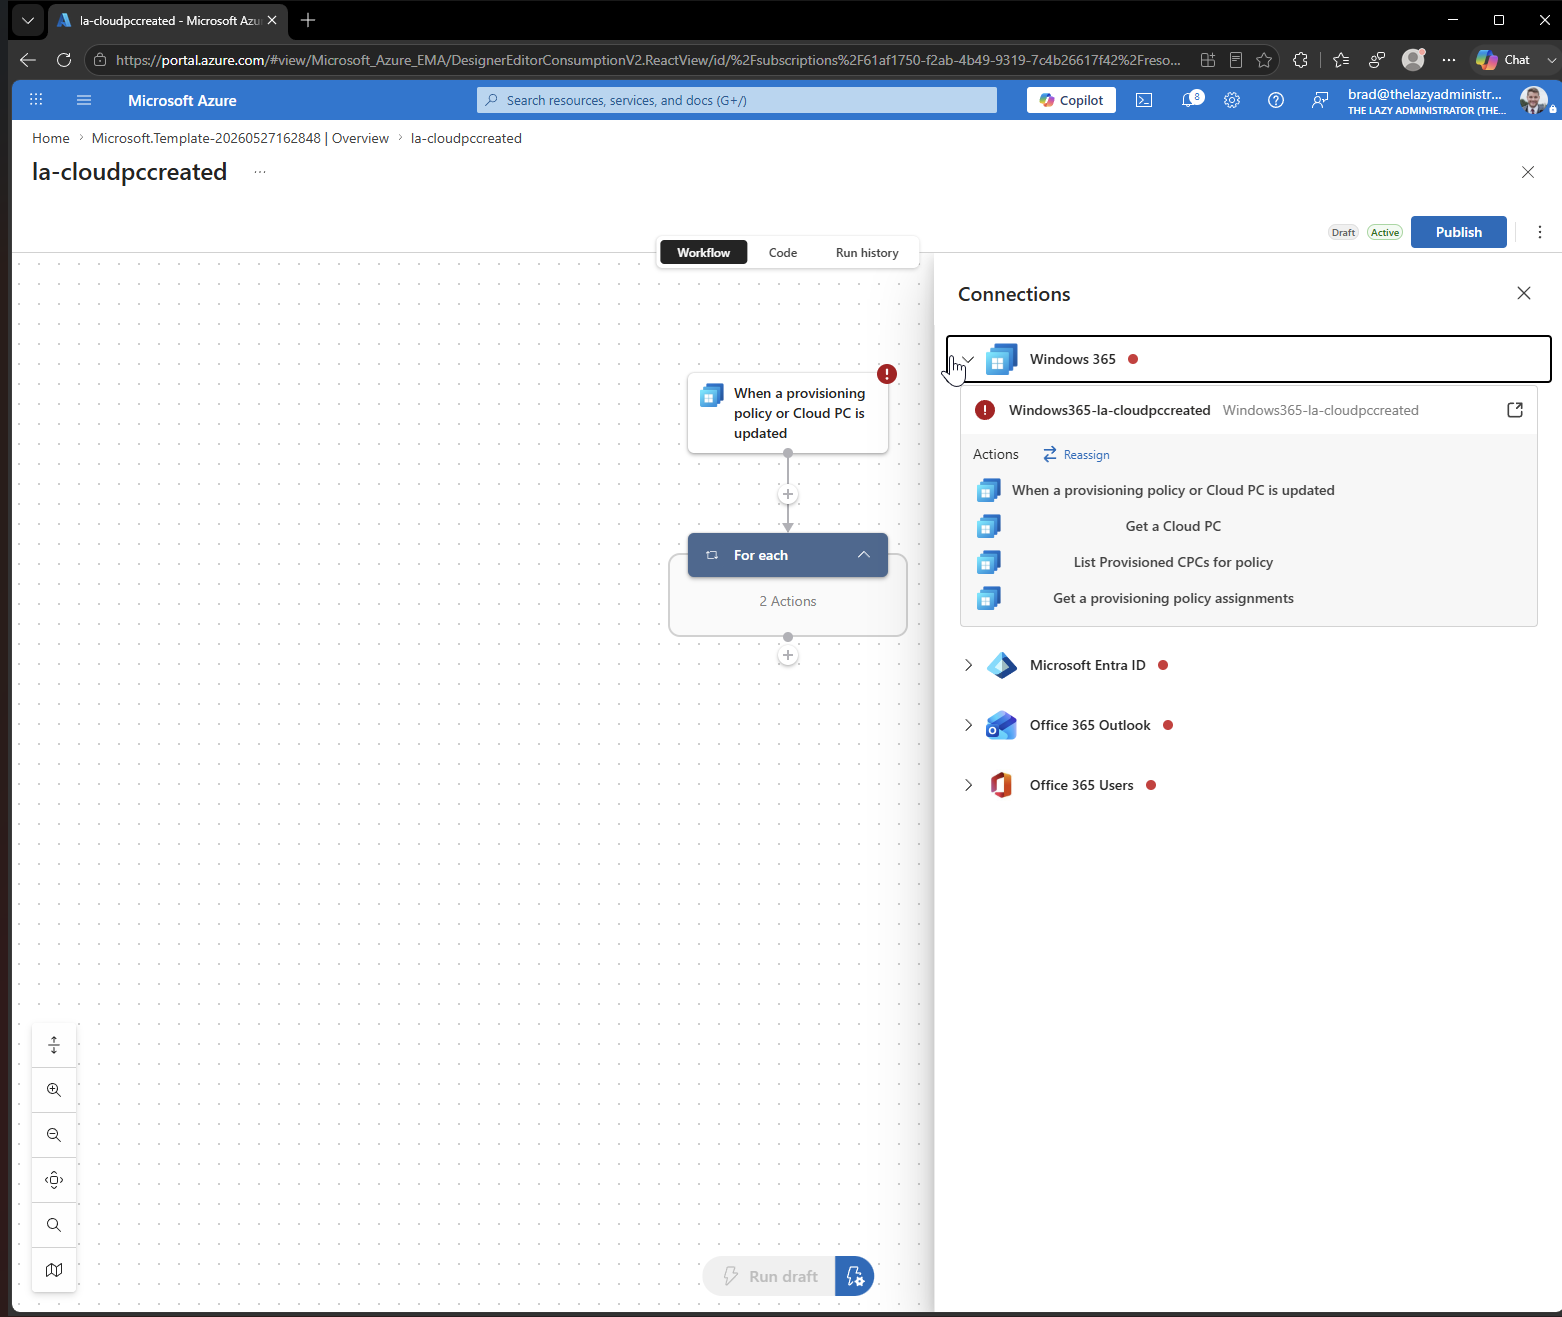
When the resource has completed its deployment, go to it and all you have to do is change the connections for Windows 365, Microsoft Entra ID, Office 365 Outlook and Office 365 Users.
Wrapping Up#
Whether you go with the Microsoft Graph and PowerShell route or the Logic App, the end result is the same: users get an email the moment their Cloud PC is ready, and you stop fielding “is it done yet” questions. The Graph approach gives you maximum control over the logic and email content. The Logic App gets you to a working solution faster with a visual designer and a one-click ARM deployment.
If you extend this with anything fun (Teams notifications, SMS, a Power Automate flow that posts to a channel), I’d love to hear about it.