
Overview#
I recently stumbled across a post from longtime Microsoft MVP Niall Brady, in which he raises an interesting point about Windows 365 Reserve: how do you prevent burning through the 10-day threshold after a user has activated their Reserve Cloud PC but no longer needs it?
Taking a step back, if you’re not familiar with Windows 365 Reserve, think of it as an insurance policy. For $1.67/user/month, your users can spin up a Windows 365 Cloud PC to keep working in the event of an incident (lost or broken PC, ransomware, cyberattack, etc.), but they can only use it for 10 days per year. If they no longer need their Reserve Cloud PC and haven’t used up the full 10 days, they or an administrator can deprovision it, or “check it back in,” and use it again later. It’s important to note, if a users Reserve cloud pc is running and they are not using it, the Windows App will alert them and tell them to consider returning it.

This brings us back to the blog post in question: can we automate alerting an IT admin that a Reserve Cloud PC isn’t being used, and can we auto-deprovision unused Reserve Cloud PCs? In this post, I’ll show you how to quickly set up automations to do both: alert IT staff about an unused Reserve Cloud PC, and auto-deprovision unused ones entirely.
The Graph API used is in beta and subject to change
Gathering the Data in Graph#
Get Cloud PC Last Sign-In#
The Microsoft Graph API enables us to get the last sign-in for a Cloud PC using the /deviceManagement/virtualEndpoint/reports/getRealTimeRemoteConnectionStatus endpoint. I can look up the last sign-in for one of my Flex Shared Cloud PCs by doing the following GET request:
GET https://graph.microsoft.com/beta/deviceManagement/virtualEndpoint/reports/getRealTimeRemoteConnectionStatus(cloudPcId='198294a2-4d1d-4c28-bb81-74c3f495a9b2')Which will return the following data:
{
  "TotalRowCount": 1,
  "Schema": [
    {
      "Column": "ManagedDeviceName",
      "PropertyType": "String"
    },
    {
      "Column": "CloudPcId",
      "PropertyType": "String"
    },
    {
      "Column": "DaysSinceLastSignIn",
      "PropertyType": "Int64"
    },
    {
      "Column": "SignInStatus",
      "PropertyType": "String"
    },
    {
      "Column": "LastActiveTime",
      "PropertyType": "DateTime"
    }
  ],
  "Values": [
    [
      "CFS-V02FJHWA5AJ",
      "198294a2-4d1d-4c28-bb81-74c3f495a9b2",
      0,
      "NotSignedIn",
      "2026-08-27T17:55:34"
    ]
  ]
}
Looking at a Cloud PC that has never been signed in, TotalRowCount is 0 and Values is an empty array.
{
  "TotalRowCount": 0,
  "Schema": [
    {
      "Column": "ManagedDeviceName",
      "PropertyType": "String"
    },
    {
      "Column": "CloudPcId",
      "PropertyType": "String"
    },
    {
      "Column": "DaysSinceLastSignIn",
      "PropertyType": "Int64"
    },
    {
      "Column": "SignInStatus",
      "PropertyType": "String"
    },
    {
      "Column": "LastActiveTime",
      "PropertyType": "DateTime"
    }
  ],
  "Values": []
}
Get Reserve Provisioning Policy ID#
Next, we need to get all Cloud PCs associated with a specific Provisioning Policy. This will allow us to iterate through the Cloud PCs and get their last sign-in. But first I need to get all Provisioning Policies and get the id of the policy for our Reserve:
GET https://graph.microsoft.com/beta/deviceManagement/virtualEndpoint/provisioningPoliciesLooking at the results, I can see my policy for my Reserve Cloud PCs. The id I need is d24de8a5-e982-469a-8d7d-2007c96bdbc8.
{
  "id": "d24de8a5-e982-469a-8d7d-2007c96bdbc8",
  "displayName": "W365-Reserve",
  "description": "",
  "imageId": "automatic",
  "imageDisplayName": "Automatic",
  "imageType": "gallery",
  "enableSingleSignOn": true,
  "cloudPcNamingTemplate": "CPC-BCDR-%RAND:5%",
  "provisioningType": "reserve",
  "managedBy": "windows365",
  "scopeIds": [
    "0"
  ],
  "createdDateTime": "2026-07-08T18:47:40.7221361Z",
  "lastModifiedDateTime": "2026-07-08T18:48:10.8457006Z",
  "createdBy": "5f660169-d691-487d-970b-965a43b00dd2",
  "lastModifiedBy": "5f660169-d691-487d-970b-965a43b00dd2",
  "microsoftManagedDesktop": null,
  "autopatch": null,
  "domainJoinConfigurations": [
    {
      "domainJoinType": "azureADJoin",
      "type": "azureADJoin",
      "regionName": "automatic",
      "onPremisesConnectionId": null,
      "regionGroup": "automatic",
      "geographicLocationType": "usCentral"
    }
  ],
  "windowsSetting": {
    "locale": "en-US"
  },
  "windowsSettings": {
    "language": "en-US"
  },
  "autopilotConfiguration": {
    "devicePreparationProfileId": "e4bb60ff-edb4-48a0-bd47-e53805c67465",
    "applicationTimeoutInMinutes": 60,
    "onFailureDeviceAccessDenied": false
  }
}
Get Cloud PCs for the Provisioning Policy#
With the Provisioning Policy id I can now do the following Graph API call to get all Cloud PCs associated with that policy:
GET https://graph.microsoft.com/beta/deviceManagement/virtualEndpoint/cloudPCs?$filter=(provisioningPolicyId+eq+'d24de8a5-e982-469a-8d7d-2007c96bdbc8')+and+(status+ne+'notProvisioned')&$top=50&$orderBy=lastModifiedDateTime+desc&$count=true&$select=id,managedDeviceId,managedDeviceName,status,lastRemoteActionResult,provisioningType,sharedDeviceDetail,connectivityResult,provisionedDateTimeThe response returns all of my Cloud PCs and the provisionedDateTime.
{
  "id": "3b6b160c-efc2-4ea0-b8c4-5bceea477f3d",
  "status": "provisionedWithWarnings",
  "managedDeviceId": "e7b60d69-3817-4775-9301-198d8289d2de",
  "managedDeviceName": "CFS-APLDPYHBF3R",
  "provisioningType": "reserve",
  "provisionedDateTime": "2026-08-27T19:26:34.6814212Z",
  "lastRemoteActionResult": {
    "actionName": "Restart",
    "actionState": "done",
    "startDateTime": "2026-08-27T19:43:40.5336955Z",
    "lastUpdatedDateTime": "2026-08-27T19:44:26.4911189Z",
    "cloudPcId": "3b6b160c-efc2-4ea0-b8c4-5bceea477f3d",
    "managedDeviceId": "e7b60d69-3817-4775-9301-198d8289d2de",
    "statusDetails": null,
    "statusDetail": null
  },
  "connectivityResult": {
    "status": "available",
    "updatedDateTime": "0001-01-01T00:00:00Z",
    "lastModifiedDateTime": "2026-08-27T19:44:38.2757926Z",
    "failedHealthCheckItems": []
  },
  "sharedDeviceDetail": {
    "assignedToUserPrincipalName": null,
    "sessionStartDateTime": null
  }
},
{
  "id": "198294a2-4d1d-4c28-bb81-74c3f495a9b2",
  "status": "provisionedWithWarnings",
  "managedDeviceId": "f5a2fbed-11ee-4ac3-804f-c88298810f33",
  "managedDeviceName": "CFS-V02FJHWA5AJ",
  "provisioningType": "reserve",
  "provisionedDateTime": "2026-08-12T00:18:47.2153482Z",
  "lastRemoteActionResult": {
    "actionName": "Restart",
    "actionState": "done",
    "startDateTime": "2026-08-11T20:09:07.8785287Z",
    "lastUpdatedDateTime": "2026-08-11T20:10:19.4138692Z",
    "cloudPcId": "198294a2-4d1d-4c28-bb81-74c3f495a9b2",
    "managedDeviceId": "f5a2fbed-11ee-4ac3-804f-c88298810f33",
    "statusDetails": null,
    "statusDetail": null
  },
  "connectivityResult": {
    "status": "available",
    "updatedDateTime": "0001-01-01T00:00:00Z",
    "lastModifiedDateTime": "2026-08-27T17:55:49.4454309Z",
    "failedHealthCheckItems": []
  },
  "sharedDeviceDetail": {
    "assignedToUserPrincipalName": null,
    "sessionStartDateTime": null
  }
}
Now we have everything we need. We can pull all Cloud PCs tied to our Reserve provisioning policy, then check each one’s last sign-in time and its provisionedDateTime.
Using this data, we’ll target any Reserve Cloud PC that has been provisioned for at least 1 day and whose last sign-in is either null or more than 1 day ago. We bring provisionedDateTime into the logic because a user could provision a Reserve Cloud PC and simply never sign in at all, in which case there would be no sign-in timestamp to check against.
Create the Automation Account and Runbook#
With the Graph queries worked out, we can move on to building the automations themselves. Both automations require the same base Automation Account and PowerShell Runbook. Go to the Azure Portal and create a new Automation Account and PowerShell runbook. In the Automation Account go to Shared Resources > Modules and add the following modules:
Microsoft.Graph.ApplicationsMicrosoft.Graph.Authentication
Select the correct module runtime version for the PowerShell runtime used by the runbook.
Next, we need to give the managed identity of the Automation Account the following API permission:
CloudPC.Read.All
To do this I used the following PowerShell commands:
Connect-MgGraph -Scopes "Application.Read.All","AppRoleAssignment.ReadWrite.All" -NoWelcome

# The Automation Account's managed identity object ID (find in Portal: Automation Account > Identity > Object (principal) ID)
$managedIdentityId = "<your-automation-account-managed-identity-object-id>"

# Microsoft Graph's service principal
$graphSpId = (Get-MgServicePrincipal -Filter "appId eq '00000003-0000-0000-c000-000000000000'").Id

# Find the CloudPC.Read.All app role
$appRole = (Get-MgServicePrincipal -ServicePrincipalId $graphSpId).AppRoles |
    Where-Object { $_.Value -eq "CloudPC.Read.All" }

# Assign it to the managed identity
New-MgServicePrincipalAppRoleAssignment -ServicePrincipalId $managedIdentityId `
    -PrincipalId $managedIdentityId `
    -ResourceId $graphSpId `
    -AppRoleId $appRole.Id
Lastly, copy the runbook PowerShell got from GitHub and save and publish it.
Alert on Unused Reserve Cloud PCs#
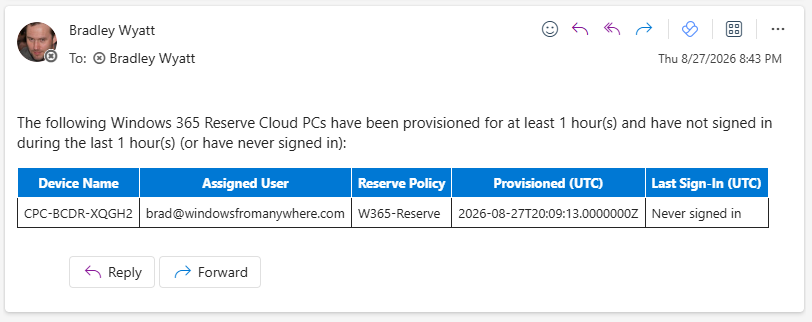
The first automation we are going to create is going to regularly check Reserve Cloud PCs and send us an email for any that could be de-provisioned. This email is going to provide us the device name, assigned user, provisioning policy, provisioned date and time, and the last sign-in date and time. From there, an IT administrator can simply confirm and proceed with a manual deprovision.
Logic App#
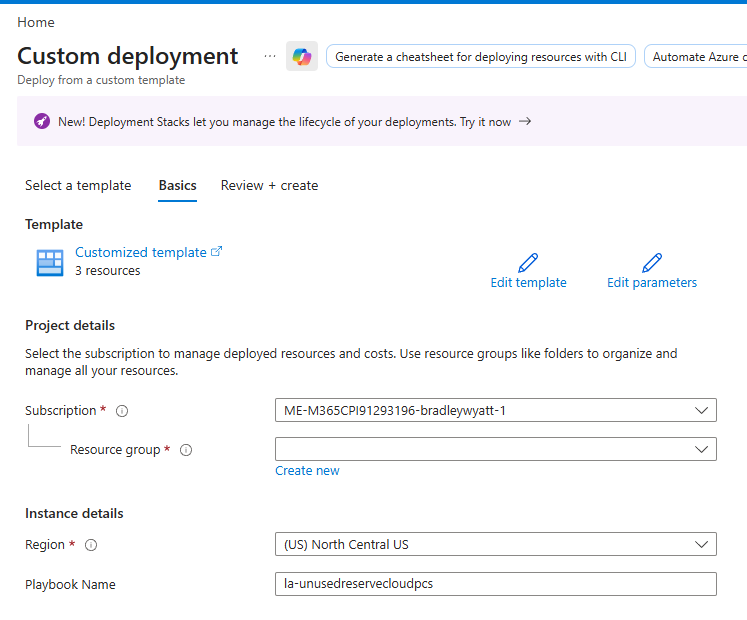
With our base Automation Account and PowerShell runbook created, we need to create a new Logic App. This Logic App will invoke the runbook, parse the results, and send the email. In the Azure Portal, we will deploy from a custom template. From the “Deploy from a custom template” page, select “Build your own template in the editor” and paste the ARM template from GitHub. The ARM Template was created using the ARM Template Generator.
Create or select a resource group, region and playbook name, then click “Review + Create”.
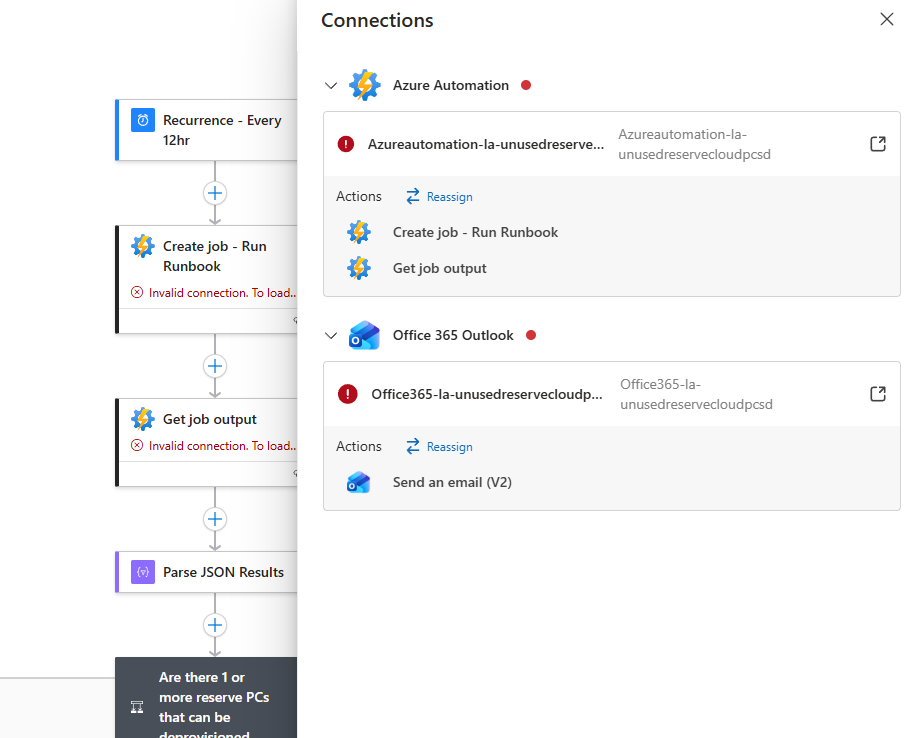
Once created, go into the Logic App and fix the connections and the recipient for the email notification. You can also change the recurrence to better fit your organization’s requirements. By default, it’s set to run every 12 hours.
Auto-Deprovision Unused Reserve Cloud PCs#
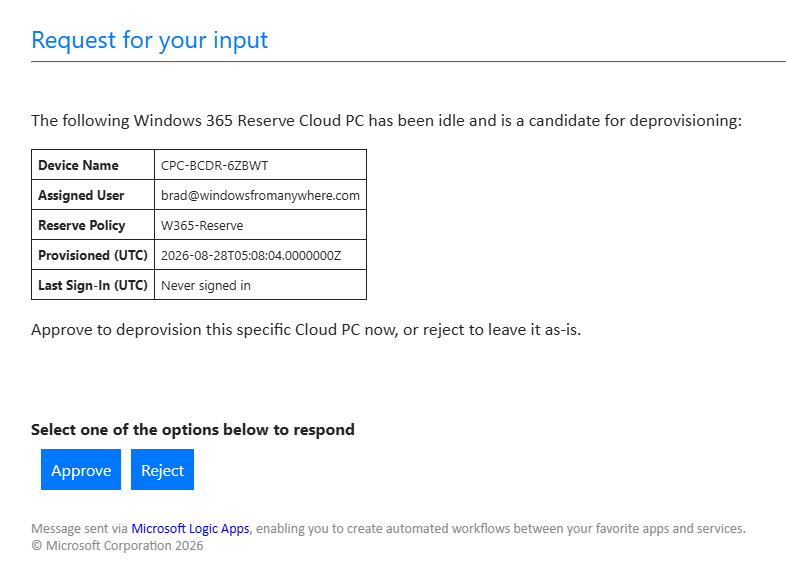
The Auto-Deprovision automation adds an additional feature to the mix by sending an approval email so you can review and automatically send the Cloud PC for deprovision without ever having to log into the portal yourself.
Runbook and Automation Account#
Due to the auto deprovisioning, the runbook requires one additional Graph API permission. Using the same Automation Account, we can create a new PowerShell runbook called Invoke-DeprovisionWindows365ReserveCloudPc and pasting the code from GitHub.
Earlier we granted the Managed Identity of the automation account CloudPC.Read.All, but now we also need to grant CloudPC.ReadWrite.All.
Connect-MgGraph -Scopes "Application.Read.All","AppRoleAssignment.ReadWrite.All" -NoWelcome

# The Automation Account's managed identity object ID (find in Portal: Automation Account > Identity > Object (principal) ID)
$managedIdentityId = "<your-automation-account-managed-identity-object-id>"

# Microsoft Graph's service principal
$graphSpId = (Get-MgServicePrincipal -Filter "appId eq '00000003-0000-0000-c000-000000000000'").Id

# Find the CloudPC.Read.All app role
$appRole = (Get-MgServicePrincipal -ServicePrincipalId $graphSpId).AppRoles |
    Where-Object { $_.Value -eq "CloudPC.ReadWrite.All" }

# Assign it to the managed identity
New-MgServicePrincipalAppRoleAssignment -ServicePrincipalId $managedIdentityId `
    -PrincipalId $managedIdentityId `
    -ResourceId $graphSpId `
    -AppRoleId $appRole.Id
Logic App#
This Logic App will iterate through each Cloud PC, send an approval email, and if approved, proceed with the deprovisioning. This allows us to automate more than just alerting.
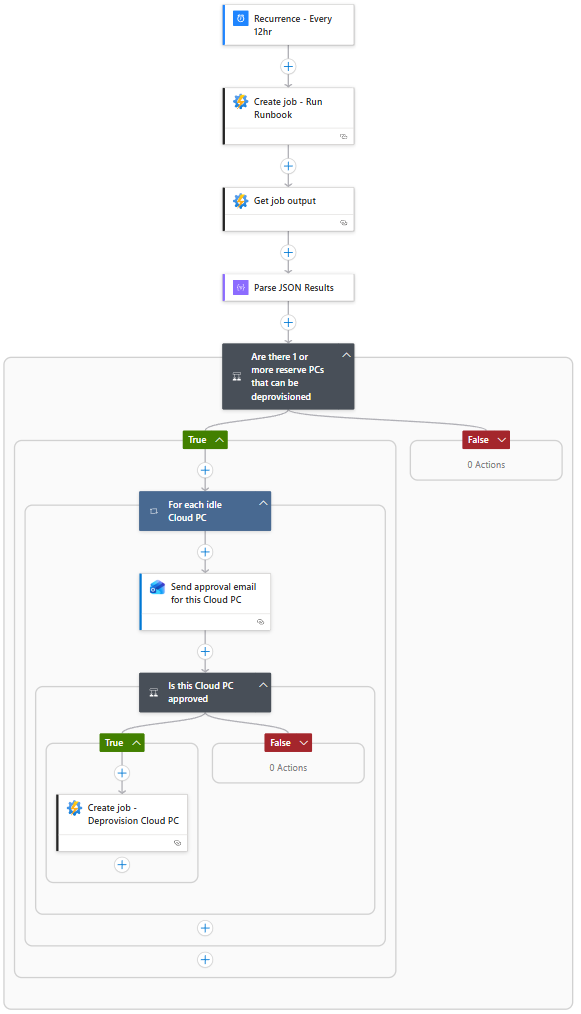
In the Azure Portal, we will deploy from a custom template. From the “Deploy from a custom template” page, select “Build your own template in the editor” and paste the ARM template from GitHub. The ARM Template was created using the ARM Template Generator.
Create or select a resource group, region and playbook name, then click “Review + Create”.
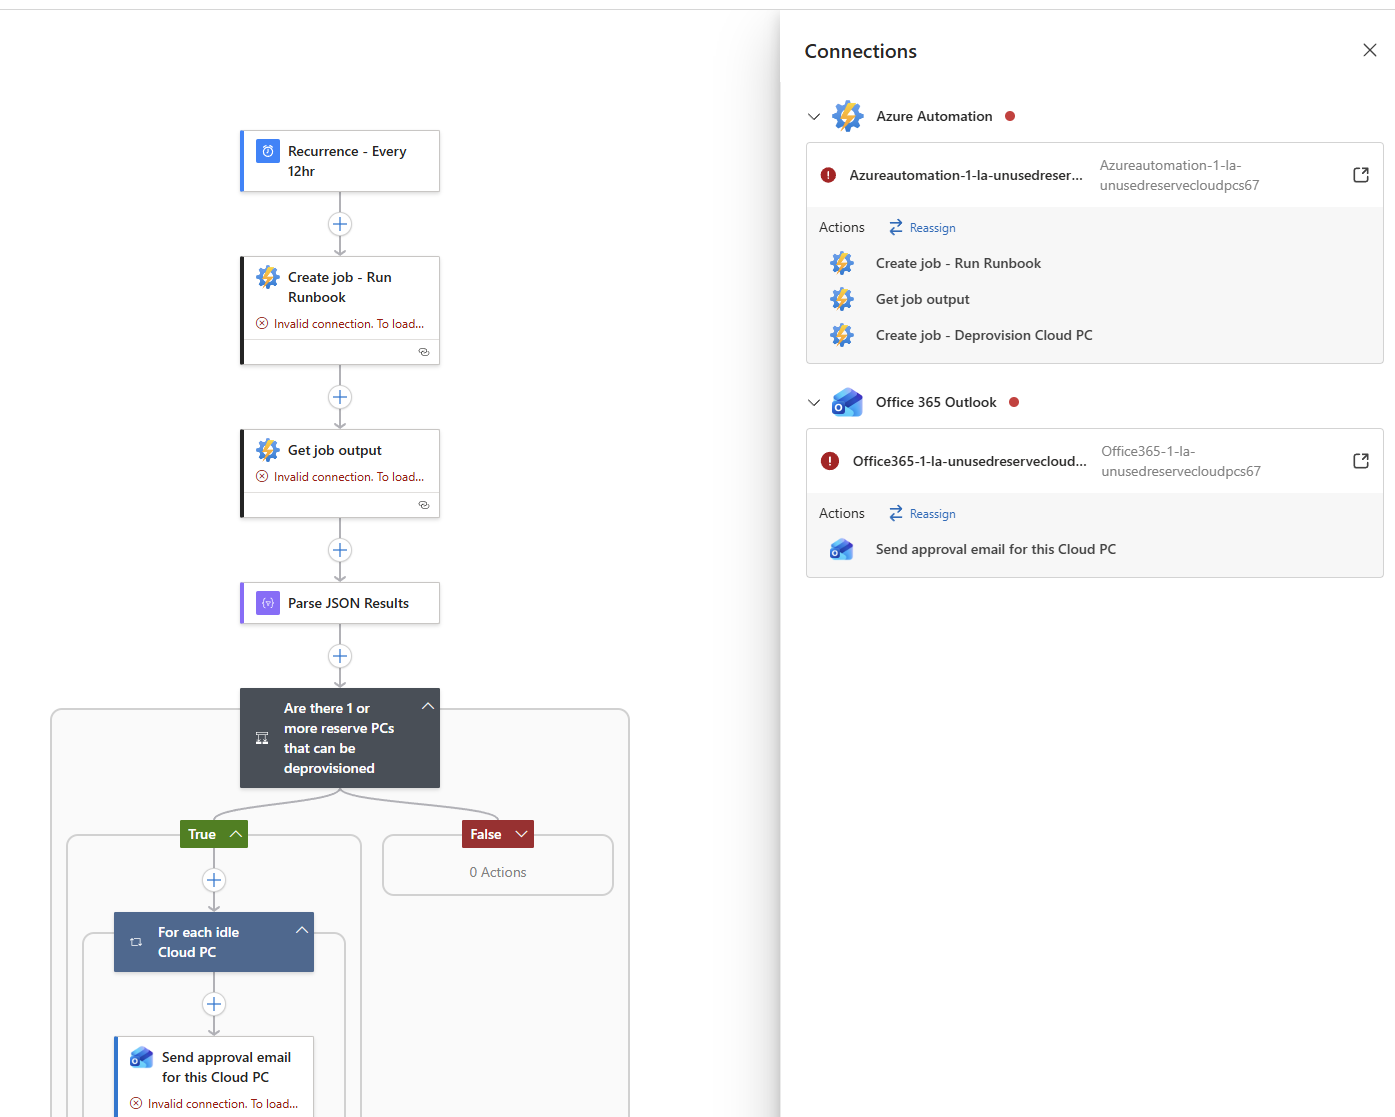
Once created, go into the Logic App and fix the connections and the recipient for the approval email. You can also change the recurrence to better fit your organization’s requirements. By default, it’s set to run every 12 hours.
Wrapping Up#
With both Logic Apps in place, you now have two ways to keep Reserve Cloud PC usage in check: a lightweight alert that lets an admin review and manually deprovision, and a fuller approval-based flow that handles the deprovisioning automatically once someone signs off. Start with the alerting Logic App if you want a human in the loop on every decision, then move to the auto-deprovision flow once you’re comfortable with how it’s flagging Cloud PCs in your environment. Either way, you’ll avoid burning through the 10-day Reserve threshold on Cloud PCs nobody’s actually using.